I am an inveterate tinkerer. Bear with me.
What is a commuter bicycle without panniers? For example, one 2014 New Year’s Resolution for me is to not drive my car to the grocery store. I have a big pair of cheap panniers that works well for that, but they are hooked together and only work as a pair. I wanted two separate panniers that can be mounted together, were versatile, easy to put on and off, and a certain size – not too big, not too small.
Of course, the smart thing would be to buy a pair – there are plenty of good, professionally-designed and well-constructed bicycle panniers around. But since when do I do the smart thing?
I am too cheap.
So I decided to make my own. I’ve been getting by with buying various containers at Goodwill and hooking them on to my bicycle with carabiner or S clips. That actually works well. The most useful is a rectangular zippered bag that held an old portable Colorado brand tape-backup unit. Still, I wanted a more conventional pannier set.
So I perused the internet, looking for “DIY Bicycle Panniers” on the search engines. I found quite a bit, from used kitty-litter boxes, to 5 gallon paint pails, to the ubiquitous hipster milk crates. I copied down the best ideas and worked on my own.

A Musette Bag like the one I used for the panniers.
For a bag, I settled on the Rothco Jumbo Musette Bag – the price was low, the local Army-Navy store had a selection at well under list price, and, most important, it had a stout map pocket – two layers of canvas on the back. So, I bought two, went to the hardware store for fittings, and set to work.

The pegboard is a tight fit slid into the back of the musette bag.
Once I had the bags, I cut a rectangle of pegboard (a little heavy, but I had some on hand) to size and slid it into the map pocket on the back. This would give the pannier shape and give me something to attach the hardware to. Then I had to decide on a hook system to hold the bag to the rack. After looking at all sorts of stuff, I decided on these little steel threaded hooks. I would mount two small angle brackets to the backing board, and thread the hooks through them.

The hooks as they came from the hardware store.
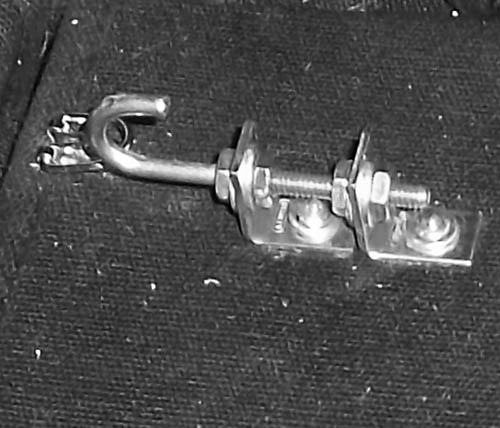
A hook mounted onto the back of the bag. Two small angle brackets, four nuts, four washers, and two pop rivets (with washers) – and it is all in place. Be sure and use locktite (blue) to keep the nuts from going loose.
I could have bolted everything to the pannier, but I used pop-rivets and aluminum washers. This worked really well, and once I had a pile of parts laid out, a drill spun up, and the pop rivet gun in hand, it was quick work to attach all the hardware. I added a metal hanger at the bottom to hold the thing down and two more at the top in case I want to bungee something on there. These extra rivets also serve to make sure the bag doesn’t tear off the backer board. It’s all surprisingly strong.
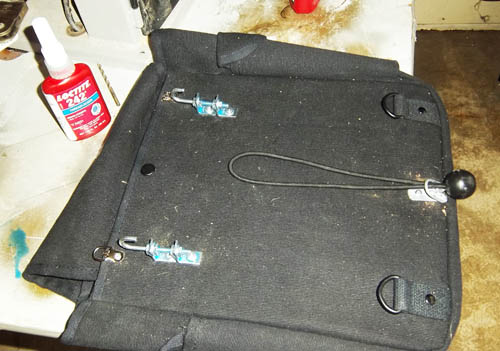
The two hooks, the ring at the bottom, and the bungee cord. Ready to go.
Finally, I had to figure out how to hold it down, keep it from swinging, or popping off the rack. I experimented with springs and ordinary bungee cords, but ended up using these small elastic cords with a plastic ball on the end. They are usually used to hold down tarps.
The elastic goes through the bottom hook of the rack, through the lower eye on the pannier, and then loops up around the upper hooks. This gives just enough tension to hold it all together, yet allows it to come off easy.
So here it is, a pair of workable panniers, for shopping, picnics, or general bombing around town. Total cost, about twenty dollars each. I think these may work.
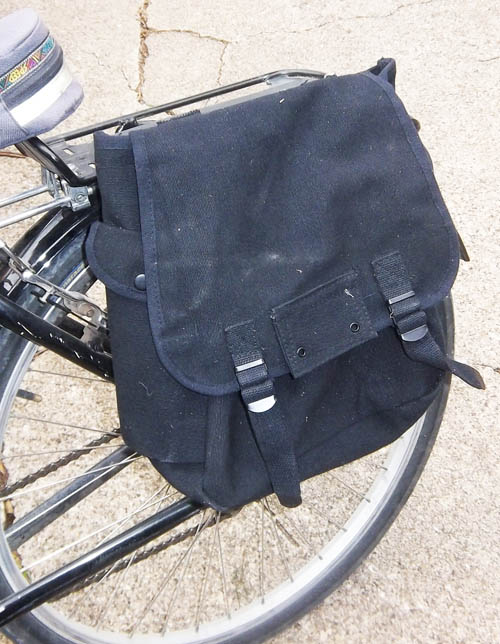
The musette bag on my commuter bike.
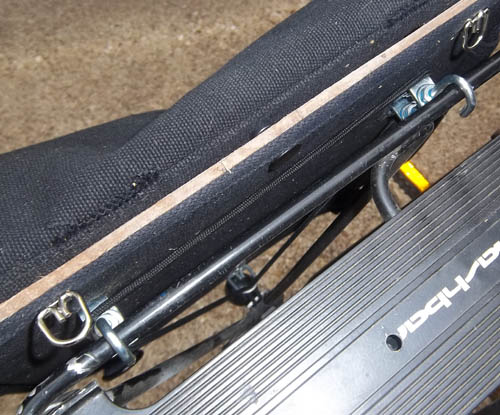
The hooks on the rails of my bicycle rack. If you look close, you can see the thin, black, bungee cord running across the hooks and then down to the bottom of the rack.

Both bags hooked onto my commuter bike.

Pingback: The First One in Almost Thirty Years | Bill Chance
Creative of you!
Thanks! I’m afraid I look at it as being cheap of me.
Actually I was going to suggest you could consider making a couple of sets and try selling them! They’re practical and nice looking. Much better than kitty litter containers! While you may not be interested in doing that, creating them might have started with a wish to save money but the application of creativity and skill has produced a unique, useful and attractive result.
I am Indonesian. I did that. and selling them. good to get money from this cheap DIY
Reblogged this on Jeffery Newton and commented:
I thought this was really interesting as I have a couple old panniers that I used to use on another bike and this just gave me the idea of doing a weekend hack job to use them again.
Pingback: Cobra Brewing Company | Bill Chance
Nice job. You might consider locking the pannier by adding a 3″ pivoting bar mounted a 1.5 inches below the hooks level, midway between them. Notches in the bar can be made in each end to snug under the rack when turned upward. Two different notch sizes can be used to fit slender or wide rack tubes. Make the bar from wood, metal, plastic etc. and have big bumper washers inside the backing plate of the bag. I prefer this to annoying and unreliable bungees.
That’s a great idea. The one problem I’ve had with the panniers is having the hooks bounce off the rack when hitting a pothole. The bungee keeps the bag from falling – but it’s disconcerting. I’ll have to try the pivoting bar – I can easily mount it to the particle board stiffener.
Pingback: Carbine On My Handlebar | Bill Chance